We're proud to be the USA's #1 Authorized retailer for high quality golf brands
Price Match Guarantee
Found a lower price elsewhere? Let us know, we’ll match it or beat it!
No Sales Tax & Free Shipping
Enjoy no sales tax and free shipping on most orders (exclusions apply) on products from leading manufacturers!
Qualified & Real Human Support
Questions? Give us a call to speak with a golf expert 571-500-8371
Description
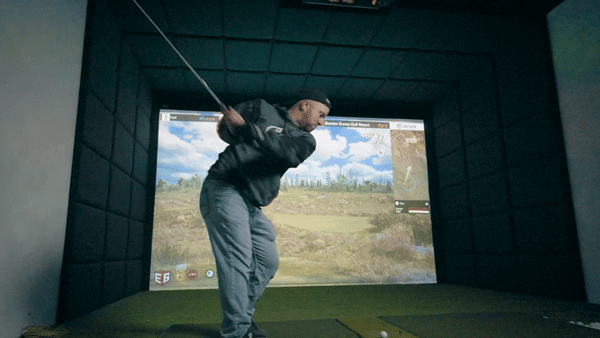
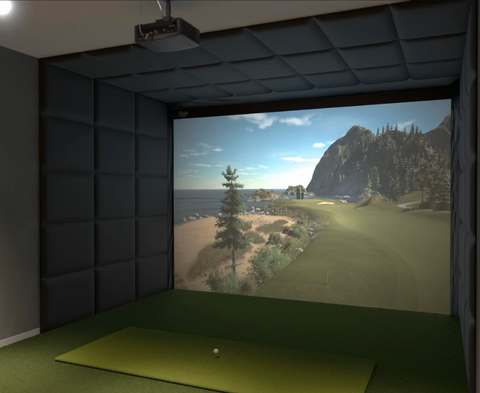
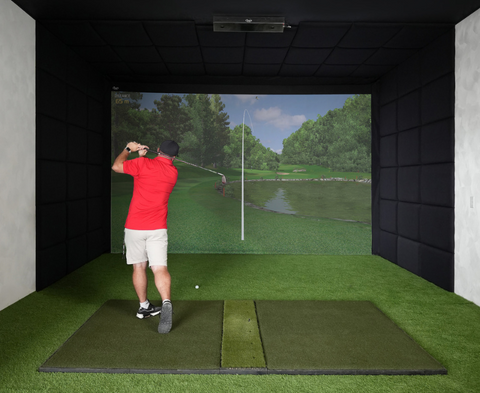
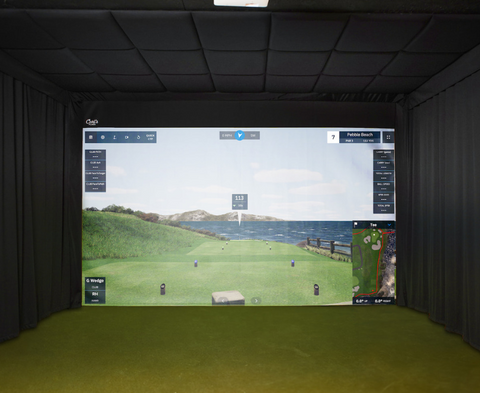
Carl's Place Built-In Golf Room Kit transforms your golf simulator setup into a fully immersive, high-end experience. With four finishing styles available, it’s designed to permanently integrate into your chosen residential or commercial space. The turf flows seamlessly into the impact screen, creating a sleek, uninterrupted visual experience.
Maximize Your Room's Potential Optimizes room layout, providing full swing clearance and maneuverability.
Enhanced Realism Delivers unmatched authenticity and immersion, offering a true-to-life indoor golf experience.
Versatile Functionality Add speakers, recliners, or home theater elements for a multifunctional entertainment space.
Crafted by Carl to Achieve a High-End "Built-In" Aesthetic Carl’s Built-In Golf Room Kit empowers both residential and commercial users to effortlessly convert virtually any room into a luxurious golf simulator haven. Designed for seamless integration, the kit allows your turf to lead directly up to the impact screen, creating a visually uninterrupted experience.
Standard features may include a Carl’s Place Premium Impact Screen, built-in impact screen mounting kit, and golf simulator blackout panels with mounting hardware.
Ideal for individuals with carpentry or handyman skills, the Carl's Built-In Golf Room Kit is meticulously designed for rooms with straight, uniform 2x4 wood-framed walls free of trim boards. Using plywood on walls and ceilings can streamline installation. However, customization may be required if your space differs from these specifications.
A Golf Impact Screen Designed for the Perfect Fit Carl’s Built-In Screen seamlessly integrates into your space without the need for any additional pipes. The kit includes corner cable anchors, pulley wheels, cables, releasable zip ties, and starter panels or hook-and-fastener tape.
With flexible mounting via cables and zip ties, you can adjust the screen for optimal bounceback and tension. Once mounted, attach the screen flaps to the starter panels or tape for a sleek and polished finish.
Each screen is crafted at Carl's Place headquarters in Milton, Wisconsin by seasoned professionals in the golf simulator industry.
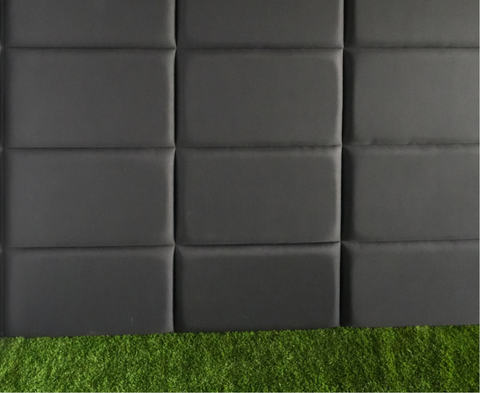
Enhance Your Golf Simulator Space with Carl's Panels Carl's Golf Room Panels provide a dual function: dimming and softening your walls and ceiling while acting as your enclosure. They install easily using French cleats and Z clips and protect surfaces from errant shots.
Each panel has an inner core and foam padding wrapped in fabric on both sides. They are custom-sized to fit your space and measure approximately 2"–2.5" thick—durable enough to swing with confidence while giving peace of mind against wall damage.
Pair the Built-In Golf Room Kit with Carl’s Golf Room Curtains Carl’s Golf Room Curtains are a flexible option for covering doors or windows and offer a clean alternative to permanent wall enclosures. Simply pull them out for use and retract when not needed.
In commercial spaces, they create privacy between bays. The fabric blocks ambient light for a more immersive experience and looks sleek from both the front and back.
Requirements
Installing Your Built-In Golf Room Kit Step-by-Step
Prepare and Measure: Review setup instructions thoroughly.
Establish the Framework: Install cables and anchors.
Mount the Screen: Secure it with cables and zip ties, then adjust tension.
Shield the Walls: Utilize curtains or padded panels for protection.
Guard the Ceiling: Install padded ceiling panels.
Ready to Golf: Your setup is now complete and ready for use.
Ideal Space Requirements
Minimum Depth: 18 ft (1 ft behind screen, 10 ft to tee, 7 ft behind tee)
Minimum Width: 14 ft (tee-centered setup)
Minimum Height: 9 ft (recommended)
Maximum Height: 11 ft (must frame out if higher)
Note: Overhead launch monitors generally require mounting at 9–10 ft height.
Ideal for Installers Skilled in Construction/Trades To achieve the built-in look, you must:
Install the impact screen 1 ft from the rear wall
Use laser levels to align everything
Remove trim boards if necessary
Anchor lag screws securely
Tension the screen properly
Follow a layout diagram for wall/ceiling panels
Use drywall anchors or mount cleats to studs
If this seems overwhelming, you may want to consider our other enclosuresinstead.
Technical Specifications
This kit forms the physical enclosure needed for your simulator, with or without padded panels or curtains. It does not include a hitting mat, projector, launch monitor, or computing device.
Processing Time: All Carl's Place products typically require 1–2 business days for processing before shipment.
Delivery Time: Most products, including enclosures, impact screens, hitting mats, hitting strips, swing cameras, and accessories, are delivered within 7–10 business days after processing.
Custom Product Delivery:
Custom enclosures, impact screens, and Built-In Screens: 7–14 business days after processing.
Built-In Panel Kits: 14–21 business days after processing.
Shipping Process: Once your order leaves our warehouse, you will receive tracking information via email. If you haven’t received a shipping notification, your order is likely still being processed.
Shipping Rates: Most Carl's Place products qualify for free standard shipping. Due to their size and weight, Built-In Panel Kits require freight shipping, with charges calculated at checkout.
How to Check Order Status: To check your order status, email us at info@indoorgolfessentials.com with your 5-digit order number. You may also call or text us at 571-500-8371 for assistance.
NOTE: Delivery times are subject to change and may vary based on carrier delays or other circumstances beyond our control. If any changes occur, we will make every effort to notify you promptly.
Returns & Refunds
Return Policy: Products can be returned within 30 days if they are in like-new condition, undamaged, and include all original packaging and accessories.
Restocking Fee: A 15% restocking fee applies to all returns. Customers are responsible for return shipping costs.
Custom Orders: Custom products such as Custom Enclosures, Impact Screens, Built-In Golf Room Kits, Built-In Screens, Padded Walls, Ceiling Panels, and Curtains cannot be returned or refunded once shipped.
If the order has already shipped, the customer is responsible for return shipping costs and the 3% processing fee.
Custom & Made-to-Order Products: Select products, including made-to-order and custom items, may incur a 25% restocking fee if the order has entered production but has not yet shipped.
Warranty Policy
Defects:Carl's Place guarantees its kits to be free from defects in both material and workmanship at the date of purchase.
Coverage Limitations:The warranty does not cover parts damaged by use, modification, or normal wear and tear. Liability is limited to the original cost of the purchased kit.
Warranty Claims:For warranty claims, you should contact us at info@indoorgolfessentials.com with a detailed description of the problem and proof of purchase.
It is recommended to inspect all items thoroughly upon delivery and contact us immediately if any issues are found.
When you shop with Indoor Golf Essentials, you get authentic products from trusted brands, full manufacturer warranty coverage, and lifetime customer support, so you can buy with complete confidence.
Customer Success Stories
my setup was a breeze and the quality blew me away for the price, My buddies and I use it every weekend, feels just like being out on the course.
Mike T. Verified Buyer
Customer support was top notch. They helped me pick the right setup for my space and even walked me through installation over the phone.
Robert L. Verified Buyer
Shipping was fast and everything arrived perfectly on time. The setup works flawlessly, super accurate readings and easy to use.
James P. Verified Buyer
I didn’t want to spend a fortune, and this setup delivered way more than I expected. Great quality and the team clearly knows their stuff.